Develop a Secure MCP App with pom.run
This guide walks you through building a secure MCP App using the Pomerium MCP App template and ssh -R 0 pom.run. pom.run is a hosted reverse SSH tunnel that gives your local MCP server a public URL and handles OAuth automatically. No auth code to write, no certificate management. The quick start gets you a working app you can test in ChatGPT or Claude.ai in about 5 minutes. The rest covers building your own tools, sharing what you're building, and deploying your MCP server behind Pomerium when you're ready to ship.
Quick Start
You need:
- Node.js 24+ (verify with
node -v) - SSH client (pre-installed on macOS/Linux; use WSL2 on Windows)
- A ChatGPT Plus subscription or Claude.ai account
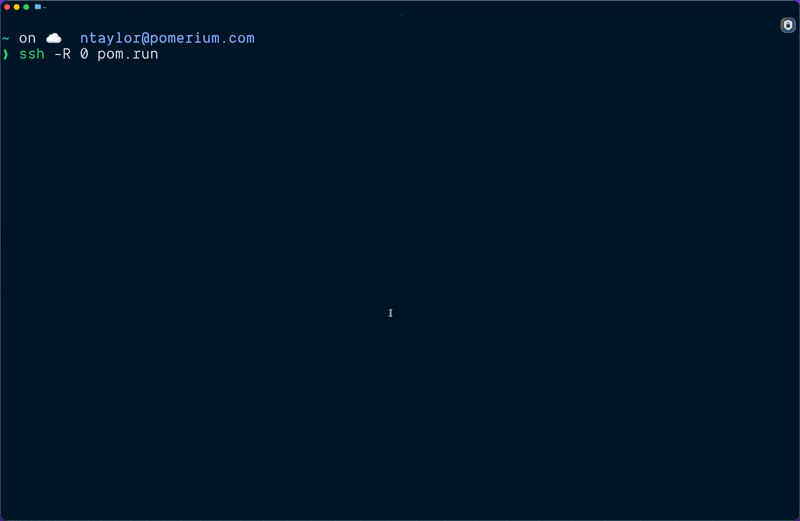
1. Open the tunnel
In a terminal, run:
ssh -R 0 pom.run
On first run, you'll see a sign-in prompt:
Please sign in with hosted to continue
https://data-plane-us-central1-1.dataplane.pomerium.com/.pomerium/sign_in?user_code=some-code
Click the link to sign in. If this is your first time, you'll be prompted to create a Pomerium account. You can sign up with email, Google, or GitHub. Authentication is handled by Pomerium's hosted authenticate service, so there's nothing to configure on your end.
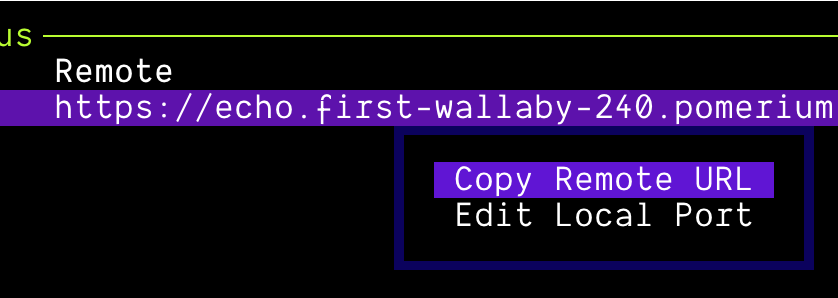
After authenticating, your terminal shows the Pomerium TUI. Find your public URL in the Port Forward Status section:
Status:  ACTIVE
Remote:  https://echo.first-wallaby-240.pomerium.app
Local:   http://localhost:8080
Keep this terminal open. The tunnel stays active as long as the SSH session is running. See Reverse Tunneling for more detail on the TUI and how the tunnel works.
If the URL is cut off, you can right click in the TUI and select Copy Remote URL to get the full URL.
2. Clone and start the template
In a new terminal:
- Git
- GitHub CLI
git clone https://github.com/pomerium/chatgpt-app-typescript-template your-mcp-app
cd your-mcp-app
npm install
# Requires GitHub CLI: https://cli.github.com/
gh repo clone pomerium/chatgpt-app-typescript-template your-mcp-app
cd your-mcp-app
npm install
Start the dev server:
- ChatGPT
- Claude.ai
npm run dev
npm run dev:inline
Claude.ai's iframe can't load assets from localhost, so inline mode bundles all JavaScript and CSS directly into the widget HTML, producing self-contained files. The widget dev server still runs in watch mode, so changes are automatically rebuilt.
Inline mode is only needed when tunneling via pom.run for the development environment. In production, once your assets are served from a public URL, Claude.ai fetches them directly and inline mode isn't required.
You can also use inline mode if you want to test the MCP on another device other than your development machine, e.g. ChatGPT or Claude on your phone.
This starts two processes:
- MCP server on
http://localhost:8080 - UI dev server on
http://localhost:4444
You should see something similar to this in your terminal:
❯ npm run dev

> chatgpt-app-typescript-template@1.0.0 dev
> concurrently "npm run dev:server" "npm run dev:widgets"

[1]
[1] > chatgpt-app-typescript-template@1.0.0 dev:widgets
[1] > npm run dev --workspace=widgets
[1]
[0]
[0] > chatgpt-app-typescript-template@1.0.0 dev:server
[0] > npm run dev --workspace=server
[0]
[0]
[0] > chatgpt-app-server@1.0.0 dev
[0] > tsx watch src/server.ts
[0]
[1]
[1] > chatgpt-app-widgets@1.0.0 dev
[1] > vite
[1]
[1]
[1] Found 1 widget(s):
[1]   - echo
[1]
[1] 3:25:38 PM [vite] (client) Re-optimizing dependencies because lockfile has changed
[1]
[1]   VITE v7.3.0  ready in 261 ms
[1]
[1]   ➜  Local:   http://localhost:4444/
[1]   ➜  Network: use --host to expose
[0] [dotenv@17.2.3] injecting env (0) from .env -- tip: 🔐 encrypt with Dotenvx: https://dotenvx.com
[0] [19:25:38] INFO: Starting MCP App Template server
[0]     port: 8080
[0]     nodeEnv: "development"
[0]     logLevel: "info"
[0]     assetsDir: "/Users/some-dev/dev/oss/chatgpt-app-typescript-template/assets"
[0]     baseUrl: ""
[0]     inlineDevMode: false
[0] [19:25:38] INFO: Server started successfully
[0]     port: 8080
[0]     mcpEndpoint: "http://localhost:8080/mcp"
[0]     healthEndpoint: "http://localhost:8080/health"
3. Connect and test
- ChatGPT
- Claude.ai
- In ChatGPT, go to Settings → Apps → Advanced settings and enable Developer mode
- Click Create app
- Set MCP Server URL to your tunnel URL +
/mcp, e.g.https://echo.first-wallaby-240.pomerium.app/mcp - Set Authentication to OAuth
- Check the acknowledgment and save

Start a new chat and send: @Echo today is a great day, where Echo is the name of the app (MCP server) you registered.
- Go to Settings → Connectors and add a new integration
- Set the MCP Server URL to your tunnel URL +
/mcp - Authenticate when prompted
Start a new chat and send: echo today is a great day
After making code changes, refresh the integration to reload tool definitions.
You should see the message displayed in an interactive widget. That's a working MCP App.
From here, you can stop. You have a working app you can build on. The sections below cover building your own tools, sharing your work, and deploying to production.
Building Your Own Tools
The echo tool in the template shows the full pattern. Here's what you need when adding your own.
Tool response
Return structuredContent for the widget and a _meta.ui.resourceUri pointing to your widget resource:
return {
  content: [{ type: "text", text: "Human-readable result" }],
  structuredContent: { result: args.input },
  _meta: {
    ui: { resourceUri: "ui://my-widget" },
  },
};
Widget entry point
Create widgets/src/widgets/my-widget.tsx. The build system auto-discovers all files matching widgets/src/widgets/*.{tsx,jsx}:
import { App } from "@modelcontextprotocol/ext-apps";
import { StrictMode, useEffect, useState } from "react";
import { createRoot } from "react-dom/client";

function MyWidget() {
  const [toolOutput, setToolOutput] = useState(null);
  const [theme, setTheme] = useState("light");

  useEffect(() => {
    const app = new App({ name: "MyWidget", version: "1.0.0" });
    app.ontoolresult = (result) =>
      setToolOutput(result.structuredContent ?? null);
    app.onhostcontextchanged = (context) => setTheme(context?.theme ?? "light");
    app.connect();
  }, []);

  return (
    <div className={theme === "dark" ? "dark" : ""}>
      <pre>{JSON.stringify(toolOutput, null, 2)}</pre>
    </div>
  );
}

// Mounting code required at the bottom of each widget file
const rootElement = document.getElementById("my-widget-root");
if (rootElement) {
  createRoot(rootElement).render(
    <StrictMode>
      <MyWidget />
    </StrictMode>,
  );
}
Widget resource registration
Register the widget resource on the server. The RESOURCE_MIME_TYPE constant used below (imported from @modelcontextprotocol/ext-apps/server) is text/html;profile=mcp-app, the MIME type MCP hosts expect for widget resources:
registerAppResource(
  server,
  "ui://my-widget",
  "ui://my-widget",
  { mimeType: RESOURCE_MIME_TYPE },
  async () => ({
    contents: [
      {
        uri: "ui://my-widget",
        mimeType: RESOURCE_MIME_TYPE,
        text: await readWidgetHtml("my-widget"),
      },
    ],
  }),
);
Then build your widgets and restart the server:
npm run build:widgets
npm run dev:server
External resources in widgets
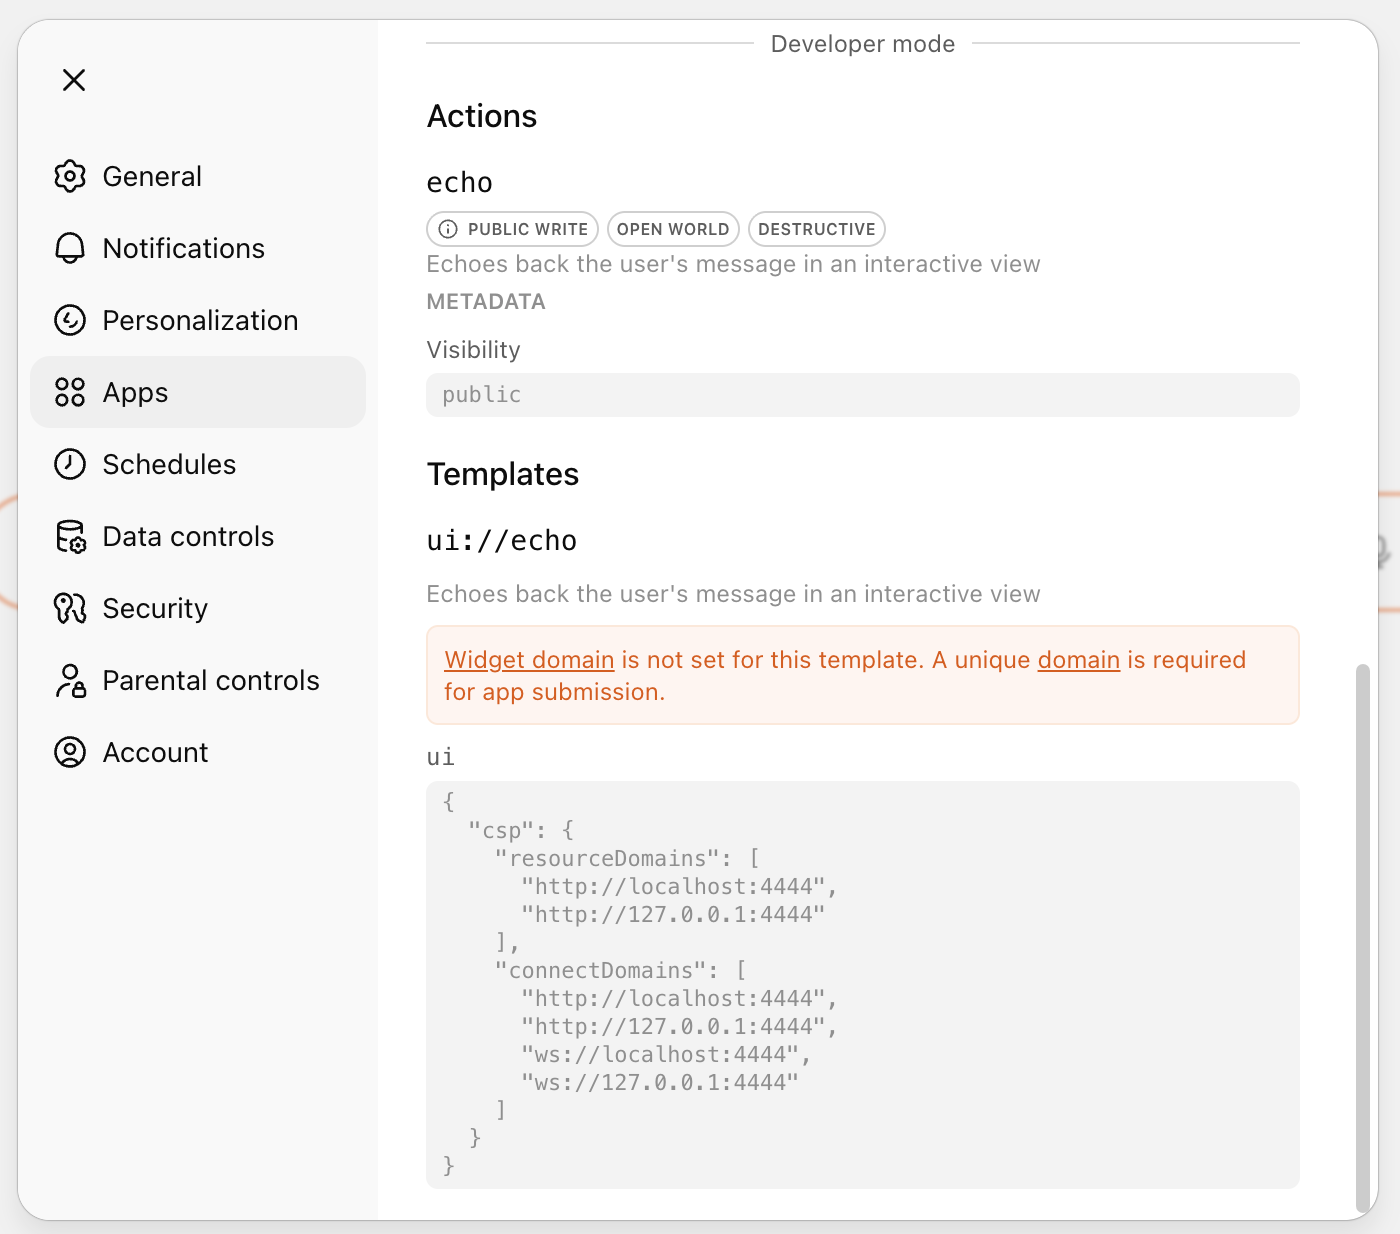
MCP hosts render widgets in sandboxed iframes with a strict Content Security Policy. Remote images and API calls are blocked by default. To allow them, declare the domains in your resource registration:
return {
  contents: [
    {
      uri: resourceUri,
      mimeType: RESOURCE_MIME_TYPE,
      text: html,
      _meta: {
        ui: {
          csp: {
            resourceDomains: ["https://cdn.example.com"],
            connectDomains: ["https://api.example.com"], // for fetch/XHR
          },
        },
      },
    },
  ],
};
List every domain explicitly. Wildcards aren't supported. If a URL redirects (e.g. https://picsum.photos to https://fastly.picsum.photos), include both.
Testing without a host
You can inspect your server locally before connecting to ChatGPT or Claude.ai:
npm run inspect
This opens the MCP Inspector in your browser where you can list tools, invoke them, and verify responses.
Production Deployment
pom.run is for development, not a deployment target. It's a hosted reverse SSH tunnel. When you're ready to ship, you need two things:
MCP server: must sit behind a Pomerium route with authentication and policy enforcement. Your options:
- Pomerium Zero: managed control plane, fastest path to production
- Open core: self-hosted, full control
- Pomerium Enterprise: for organizations that need the enterprise console
Widget assets: must be publicly accessible because MCP hosts render widgets in sandboxed iframes and can't forward credentials. Serve them from a Pomerium public route, or host them anywhere static assets work: Netlify, Vercel, a CDN via BASE_URL. Your call.
Build
npm run build
This compiles widget bundles with content hashing and the server TypeScript. Outputs:
assets/: optimized widget bundlesserver/dist/: compiled server code
Start the production server:
NODE_ENV=production npm start
Docker
The template includes a multi-stage Dockerfile:
docker build -f docker/Dockerfile -t my-mcp-app:latest .
docker-compose -f docker/docker-compose.yml up -d
Verify it's healthy:
curl http://localhost:8080/health
Pomerium routes and deployment
Troubleshooting
HTTP 503 errors
This usually means the tunnel, the local MCP server, or both aren't reachable:
- Tunnel isn't running — make sure
ssh -R 0 pom.runis running in a terminal and the session is active. - MCP server isn't running — if the tunnel is up but you're still getting 503s, confirm the MCP server is running locally on
http://localhost:8080. Start it withnpm run dev. - Both are down — restart both the tunnel and the dev server.
MCP host can't connect to your server
If you're not getting a 503 but your MCP host (e.g. ChatGPT) still can't connect, check that you're using the full MCP endpoint URL with the /mcp path. For example, use https://echo.first-wallaby-240.pomerium.app/mcp, not https://echo.first-wallaby-240.pomerium.app.
Widget not rendering
Check that your resource registration uses text/html;profile=mcp-app as the MIME type. Verify assets/ exists and contains built widget files (ls assets/). Rebuild with npm run build:widgets and restart the server.
Widget renders in ChatGPT but not Claude.ai
Claude.ai's Content Security Policy (CSP) blocks loading resources from localhost, so widgets that reference external scripts or stylesheets on localhost:4444 won't render. Run npm run dev:inline instead of npm run dev — inline mode bundles all JavaScript and CSS directly into the widget HTML, producing self-contained files that work within Claude's CSP restrictions.
Remote images or API calls not loading in widgets
MCP hosts render widgets in sandboxed iframes with strict CSP. If remote images or fetch calls aren't working, you need to allowlist their domains in your widget resource registration:
return {
  contents: [
    {
      uri: resourceUri,
      mimeType: RESOURCE_MIME_TYPE,
      text: html,
      _meta: {
        ui: {
          csp: {
            resourceDomains: ["https://cdn.example.com"],
            connectDomains: ["https://api.example.com"],
          },
        },
      },
    },
  ],
};
List every domain explicitly — wildcards aren't supported. If a URL redirects (e.g. https://picsum.photos → https://fastly.picsum.photos), include both the original and the redirect target.
Tool not appearing in host
Test locally with npm run inspect first. If the tool doesn't show in the inspector, check server logs for schema errors.
If it works in the inspector but not in your MCP host, the host is likely using a cached tool list. MCP hosts cache tools when you first connect, so after adding or modifying tools you need to refresh. For example, in ChatGPT, go to Settings → Apps, select your app, and click Refresh under the Information section:
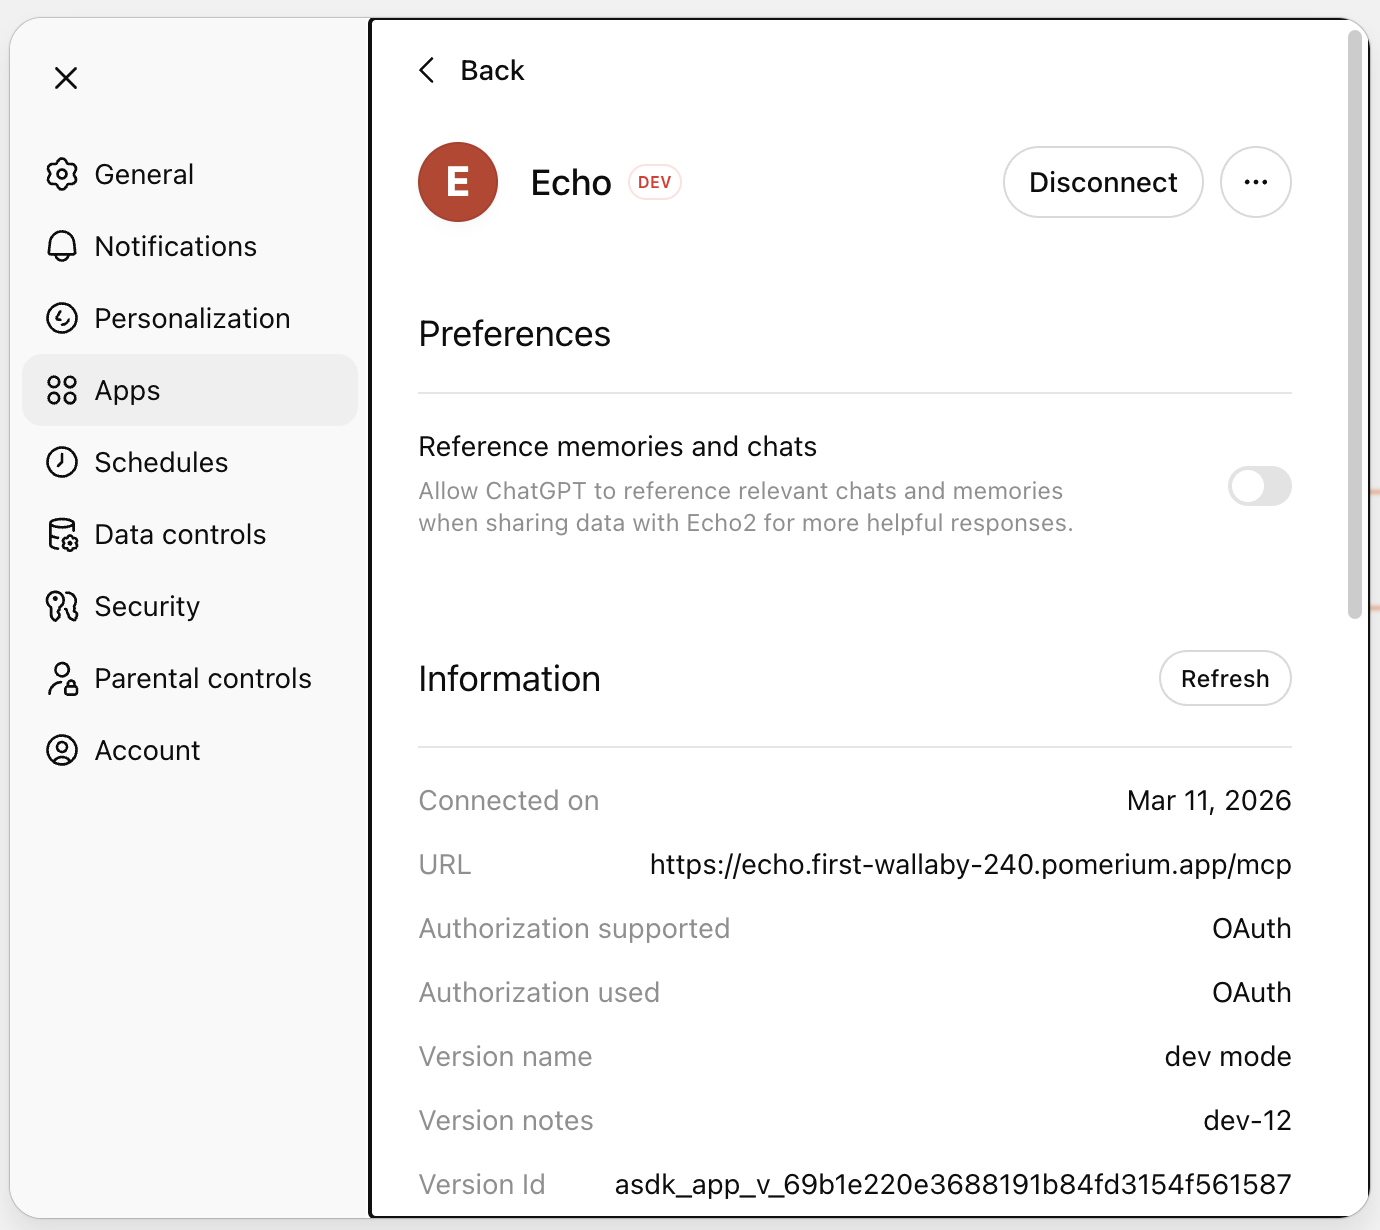
You can also verify your registered tools and widget resources are correct from the app's detail view:
Widget not mounting (blank iframe)
Check that the root element ID in your widget's document.getElementById() call matches the ID in the HTML template. A mismatch causes the widget to silently fail to mount with no error in the host.
Text response works but no widget renders
Make sure your tool response includes _meta.ui.resourceUri pointing to a registered widget resource. Without it, the host displays the text content but has no widget to render.
Additional Resources
- pomerium/chatgpt-app-typescript-template: Full README with project structure, App API reference, display modes, Storybook, and Docker
- MCP Full Reference: Token types, session lifecycle, configuration
- Protect an MCP Server: Permanent deployment behind Pomerium
- Limit MCP Tool Calling: Fine-grained tool-level authorization
- MCP Apps extension spec: The open standard this is built on